A web service is a web-based functionality accessed using the protocols of the web to be used by the web applications. There are three aspects of web service development:
- Creating the web service
- Creating a proxy
- Consuming the web service
Creating a Web Service
A web service is a web application which is basically a class consisting of methods that could be used by other applications. It also follows a code-behind architecture such as the ASP.NET web pages, although it does not have a user interface.
To understand the concept let us create a web service to provide stock price information. The clients can query about the name and price of a stock based on the stock symbol. To keep this example simple, the values are hardcoded in a two-dimensional array. This web service has three methods:
- A default HelloWorld method
- A GetName Method
- A GetPrice Method
Take the following steps to create the web service:
Step (1) : Select File -> New -> Web Site in Visual Studio, and then select ASP.NET Web Service.
Step (2) : A web service file called Service.asmx and its code behind file, Service.cs is created in the App_Code directory of the project.
Step (3) : Change the names of the files to StockService.asmx and StockService.cs.
Step (4) : The .asmx file has simply a WebService directive on it:
<%@ WebService Language="C#" CodeBehind="~/App_Code/StockService.cs" Class="StockService" %>
Step (5) : Open the StockService.cs file, the code generated in it is the basic Hello World service. The default web service code behind file looks like the following:
using System;
using System.Collections;
using System.ComponentModel;
using System.Data;
using System.Linq;

using System.Web;
using System.Web.Services;
using System.Web.Services.Protocols;

using System.Xml.Linq;

namespace StockService
{
   // <summary>
   // Summary description for Service1
   // <summary>

   [WebService(Namespace = "http://tempuri.org/")]
   [WebServiceBinding(ConformsTo = WsiProfiles.BasicProfile1_1)]
   [ToolboxItem(false)]

   // To allow this Web Service to be called from script,
   // using ASP.NET AJAX, uncomment the following line.
   // [System.Web.Script.Services.ScriptService]

   public class Service1 : System.Web.Services.WebService
   {
      [WebMethod]

      public string HelloWorld()
      {
         return "Hello World";
      }
   }
}
Step (6) : Change the code behind file to add the two dimensional array of strings for stock symbol, name and price and two web methods for getting the stock information.
using System;
using System.Linq;

using System.Web;
using System.Web.Services;
using System.Web.Services.Protocols;

using System.Xml.Linq;

[WebService(Namespace = "http://tempuri.org/")]
[WebServiceBinding(ConformsTo = WsiProfiles.BasicProfile1_1)]

// To allow this Web Service to be called from script,
// using ASP.NET AJAX, uncomment the following line.
// [System.Web.Script.Services.ScriptService]

public class StockService : System.Web.Services.WebService
{
   public StockService () {
      //Uncomment the following if using designed components
      //InitializeComponent();
   }

   string[,] stocks =
   {
      {"RELIND", "Reliance Industries", "1060.15"},
      {"ICICI", "ICICI Bank", "911.55"},
      {"JSW", "JSW Steel", "1201.25"},
      {"WIPRO", "Wipro Limited", "1194.65"},
      {"SATYAM", "Satyam Computers", "91.10"}
   };

   [WebMethod]
   public string HelloWorld() {
      return "Hello World";
   }

   [WebMethod]
   public double GetPrice(string symbol)
   {
      //it takes the symbol as parameter and returns price
      for (int i = 0; i < stocks.GetLength(0); i++)
      {
         if (String.Compare(symbol, stocks[i, 0], true) == 0)
         return Convert.ToDouble(stocks[i, 2]);
      }

      return 0;
   }

   [WebMethod]
   public string GetName(string symbol)
   {
      // It takes the symbol as parameter and
      // returns name of the stock
      for (int i = 0; i < stocks.GetLength(0); i++)
      {
         if (String.Compare(symbol, stocks[i, 0], true) == 0)
         return stocks[i, 1];
      }

      return "Stock Not Found";
   }
}
Step (7) : Running the web service application gives a web service test page, which allows testing the service methods.
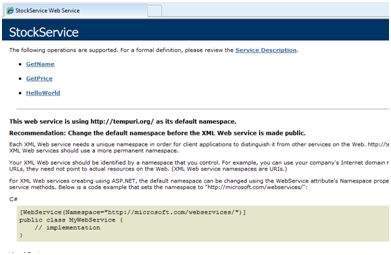
Step (8) : Click on a method name, and check whether it runs properly.
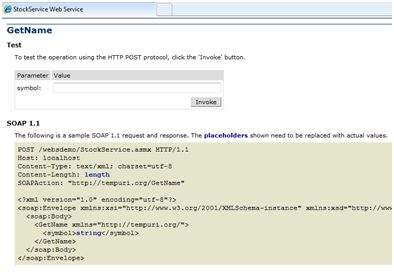
Step (9) : For testing the GetName method, provide one of the stock symbols, which are hard coded, it returns the name of the stock

Consuming the Web Service
For using the web service, create a web site under the same solution. This could be done by right clicking on the Solution name in the Solution Explorer. The web page calling the web service should have a label control to display the returned results and two button controls one for post back and another for calling the service.
The content file for the web application is as follows:
<%@ Page Language="C#" AutoEventWireup="true" CodeBehind="Default.aspx.cs" Inherits="wsclient._Default" %>

<!DOCTYPE html PUBLIC "-//W3C//DTD XHTML 1.0 Transitional//EN" "http://www.w3.org/TR/xhtml1/DTD/xhtml1-transitional.dtd">

<html xmlns="http://www.w3.org/1999/xhtml" >

   <head runat="server">
      <title>
         Untitled Page
      </title>
   </head>

   <body>

      <form id="form1" runat="server">
         <div>

            <h3>Using the Stock Service</h3>

            <br /> <br />

            <asp:Label ID="lblmessage" runat="server"></asp:Label>

            <br /> <br />

            <asp:Button ID="btnpostback" runat="server" onclick="Button1_Click" Text="Post Back" style="width:132px" />

            <asp:Button ID="btnservice" runat="server" onclick="btnservice_Click"  Text="Get Stock" style="width:99px" />

         </div>
      </form>

   </body>
</html>
The code behind file for the web application is as follows:
using System;
using System.Collections;
using System.Configuration;
using System.Data;
using System.Linq;

using System.Web;
using System.Web.Security;
using System.Web.UI;
using System.Web.UI.HtmlControls;
using System.Web.UI.WebControls;
using System.Web.UI.WebControls.WebParts;

using System.Xml.Linq;

//this is the proxy
using localhost;

namespace wsclient
{
   public partial class _Default : System.Web.UI.Page
   {
      protected void Page_Load(object sender, EventArgs e)
      {
         if (!IsPostBack)
         {
            lblmessage.Text = "First Loading Time: " +  DateTime.Now.ToLongTimeString
         }
         else
         {
            lblmessage.Text = "PostBack at: " + DateTime.Now.ToLongTimeString();
         }
      }

      protected void btnservice_Click(object sender, EventArgs e)
      {
         StockService proxy = new StockService();
         lblmessage.Text = String.Format("Current SATYAM Price:{0}",
         proxy.GetPrice("SATYAM").ToString());
      }
   }
}
Creating the Proxy
A proxy is a stand-in for the web service codes. Before using the web service, a proxy must be created. The proxy is registered with the client application. Then the client application makes the calls to the web service as it were using a local method.
The proxy takes the calls, wraps it in proper format and sends it as a SOAP request to the server. SOAP stands for Simple Object Access Protocol. This protocol is used for exchanging web service data.
When the server returns the SOAP package to the client, the proxy decodes everything and presents it to the client application.
Before calling the web service using the btnservice_Click, a web reference should be added to the application. This creates a proxy class transparently, which is used by the btnservice_Click event.
protected void btnservice_Click(object sender, EventArgs e)
{
   StockService proxy = new StockService();
   lblmessage.Text = String.Format("Current SATYAM Price: {0}",
   proxy.GetPrice("SATYAM").ToString());
}
Take the following steps for creating the proxy:
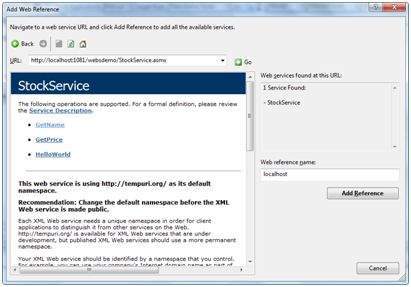
Step (1) : Right click on the web application entry in the Solution Explorer and click on 'Add Web Reference'.
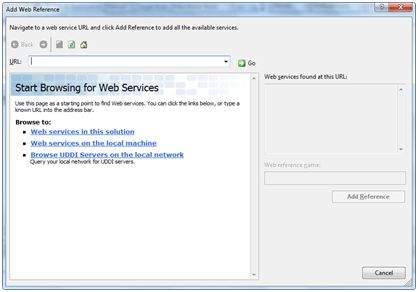
Step (2) : Select 'Web Services in this solution'. It returns the StockService reference.
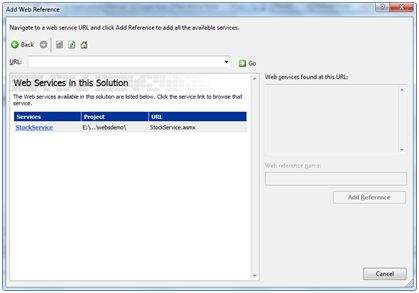
Step (3) : Clicking on the service opens the test web page. By default the proxy created is called 'localhost', you can rename it. Click on 'Add Reference' to add the proxy to the client application.
Include the proxy in the code behind file by adding:
using localhost;
A thread is defined as the execution path of a program. Each thread defines a unique flow of control. If your application involves complicated and time consuming operations such as database access or some intense I/O operations, then it is often helpful to set different execution paths or threads, with each thread performing a particular job.
Threads are lightweight processes. One common example of use of thread is implementation of concurrent programming by modern operating systems. Use of threads saves wastage of CPU cycle and increases efficiency of an application.
So far we compiled programs where a single thread runs as a single process which is the running instance of the application. However, this way the application can perform one job at a time. To make it execute multiple tasks at a time, it could be divided into smaller threads.
In .Net, the threading is handled through the 'System.Threading' namespace. Creating a variable of the System.Threading.Thread type allows you to create a new thread to start working with. It allows you to create and access individual threads in a program.
Creating Thread
A thread is created by creating a Thread object, giving its constructor a ThreadStart reference.
ThreadStart childthreat = new ThreadStart(childthreadcall);
Thread Life Cycle
The life cycle of a thread starts when an object of the System.Threading.Thread class is created and ends when the thread is terminated or completes execution.
Following are the various states in the life cycle of a thread:
-
The Unstarted State : It is the situation when the instance of the thread is created but the Start method is not called.
-
The Ready State : It is the situation when the thread is ready to execute and waiting CPU cycle.
-
The Not Runnable State : a thread is not runnable, when:
- Sleep method has been called
- Wait method has been called
- Blocked by I/O operations
-
The Dead State : It is the situation when the thread has completed execution or has been aborted.
Thread Priority
The Priority property of the Thread class specifies the priority of one thread with respect to other. The .Net runtime selects the ready thread with the highest priority.
The priorities could be categorized as:
- Above normal
- Below normal
- Highest
- Lowest
- Normal
Once a thread is created, its priority is set using the Priority property of the thread class.
NewThread.Priority = ThreadPriority.Highest;
Thread Properties & Methods
The Thread class has the following important properties:
Property Description CurrentContext Gets the current context in which the thread is executing. CurrentCulture Gets or sets the culture for the current thread. CurrentPrinciple Gets or sets the thread's current principal for role-based security. CurrentThread Gets the currently running thread. CurrentUICulture Gets or sets the current culture used by the Resource Manager to look up culture-specific resources at run time. ExecutionContext Gets an ExecutionContext object that contains information about the various contexts of the current thread. IsAlive Gets a value indicating the execution status of the current thread. IsBackground Gets or sets a value indicating whether or not a thread is a background thread. IsThreadPoolThread Gets a value indicating whether or not a thread belongs to the managed thread pool. ManagedThreadId Gets a unique identifier for the current managed thread. Name Gets or sets the name of the thread. Priority Gets or sets a value indicating the scheduling priority of a thread. ThreadState Gets a value containing the states of the current thread.
The Thread class has the following important methods:
Methods Description Abort Raises a ThreadAbortException in the thread on which it is invoked, to begin the process of terminating the thread. Calling this method usually terminates the thread. AllocateDataSlot Allocates an unnamed data slot on all the threads. For better performance, use fields that are marked with the ThreadStaticAttribute attribute instead. AllocateNamedDataSlot Allocates a named data slot on all threads. For better performance, use fields that are marked with the ThreadStaticAttribute attribute instead. BeginCriticalRegion Notifies a host that execution is about to enter a region of code in which the effects of a thread abort or unhandled exception might endanger other tasks in the application domain. BeginThreadAffinity Notifies a host that managed code is about to execute instructions that depend on the identity of the current physical operating system thread. EndCriticalRegion Notifies a host that execution is about to enter a region of code in which the effects of a thread abort or unhandled exception are limited to the current task. EndThreadAffinity Notifies a host that managed code has finished executing instructions that depend on the identity of the current physical operating system thread. FreeNamedDataSlot Eliminates the association between a name and a slot, for all threads in the process. For better performance, use fields that are marked with the ThreadStaticAttribute attribute instead. GetData Retrieves the value from the specified slot on the current thread, within the current thread's current domain. For better performance, use fields that are marked with the ThreadStaticAttribute attribute instead. GetDomain Returns the current domain in which the current thread is running. GetDomainID Returns a unique application domain identifier. GetNamedDataSlot Looks up a named data slot. For better performance, use fields that are marked with the ThreadStaticAttribute attribute instead. Interrupt Interrupts a thread that is in the WaitSleepJoin thread state. Join Blocks the calling thread until a thread terminates, while continuing to perform standard COM and SendMessage pumping. This method has different overloaded forms. MemoryBarrier Synchronizes memory access as follows: The processor executing the current thread cannot reorder instructions in such a way that memory accesses prior to the call to MemoryBarrier execute after memory accesses that follow the call to MemoryBarrier. ResetAbort Cancels an Abort requested for the current thread. SetData Sets the data in the specified slot on the currently running thread, for that thread's current domain. For better performance, use fields marked with the ThreadStaticAttribute attribute instead. Start Starts a thread. Sleep Makes the thread pause for a period of time. SpinWait Causes a thread to wait the number of times defined by the iterations parameter. VolatileRead() Reads the value of a field. The value is the latest written by any processor in a computer, regardless of the number of processors or the state of processor cache. This method has different overloaded forms. VolatileWrite() Writes a value to a field immediately, so that the value is visible to all processors in the computer. This method has different overloaded forms. Yield Causes the calling thread to yield execution to another thread that is ready to run on the current processor. The operating system selects the thread to yield to.
Example
The following example illustrates the uses of the Thread class. The page has a label control for displaying messages from the child thread. The messages from the main program are directly displayed using the Response.Write() method. Hence they appear on the top of the page.
The source file is as follows:
<%@ Page Language="C#" AutoEventWireup="true" CodeBehind="Default.aspx.cs" Inherits="threaddemo._Default" %>
<!DOCTYPE html PUBLIC "-//W3C//DTD XHTML 1.0 Transitional//EN" "http://www.w3.org/TR/xhtml1/DTD/xhtml1-transitional.dtd">
<html xmlns="http://www.w3.org/1999/xhtml" >
<head runat="server">
<title>
Untitled Page
</title>
</head>
<body>
<form id="form1" runat="server">
<div>
<h3>Thread Example</h3>
</div>
<asp:Label ID="lblmessage" runat="server" Text="Label">
</asp:Label>
</form>
</body>
</html>
The code behind file is as follows:
using System;
using System.Collections;
using System.Configuration;
using System.Data;
using System.Linq;
using System.Web;
using System.Web.Security;
using System.Web.UI;
using System.Web.UI.HtmlControls;
using System.Web.UI.WebControls;
using System.Web.UI.WebControls.WebParts;
using System.Xml.Linq;
using System.Threading;
namespace threaddemo
{
public partial class _Default : System.Web.UI.Page
{
protected void Page_Load(object sender, EventArgs e)
{
ThreadStart childthreat = new ThreadStart(childthreadcall);
Response.Write("Child Thread Started <br/>");
Thread child = new Thread(childthreat);
child.Start();
Response.Write("Main sleeping for 2 seconds.......<br/>");
Thread.Sleep(2000);
Response.Write("<br/>Main aborting child thread<br/>");
child.Abort();
}
public void childthreadcall()
{
try{
lblmessage.Text = "<br />Child thread started <br/>";
lblmessage.Text += "Child Thread: Coiunting to 10";
for( int i =0; i<10; i++)
{
Thread.Sleep(500);
lblmessage.Text += "<br/> in Child thread </br>";
}
lblmessage.Text += "<br/> child thread finished";
}catch(ThreadAbortException e){
lblmessage.Text += "<br /> child thread - exception";
}finally{
lblmessage.Text += "<br /> child thread - unable to catch the exception";
}
}
}
}
Observe the following
-
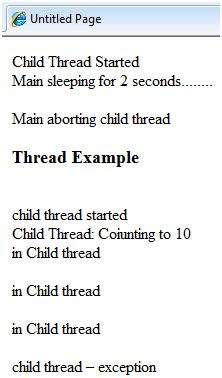
When the page is loaded, a new thread is started with the reference of the method childthreadcall(). The main thread activities are displayed directly on the web page.
-
The second thread runs and sends messages to the label control.
-
The main thread sleeps for 2000 ms, during which the child thread executes.
-
The child thread runs till it is aborted by the main thread. It raises the ThreadAbortException and is terminated.
-
Control returns to the main thread.
When executed the program sends the following messages:
The behavior of an ASP.NET application is affected by different settings in the configuration files:
- machine.config
- web.config
The machine.config file contains default and the machine-specific value for all supported settings. The machine settings are controlled by the system administrator and applications are generally not given access to this file.
An application however, can override the default values by creating web.config files in its roots folder. The web.config file is a subset of the machine.config file.
If the application contains child directories, it can define a web.config file for each folder. Scope of each configuration file is determined in a hierarchical top-down manner.
Any web.config file can locally extend, restrict, or override any settings defined on the upper level.
Visual Studio generates a default web.config file for each project. An application can execute without a web.config file, however, you cannot debug an application without a web.config file.
The following figure shows the Solution Explorer for the sample example used in the web services tutorial:
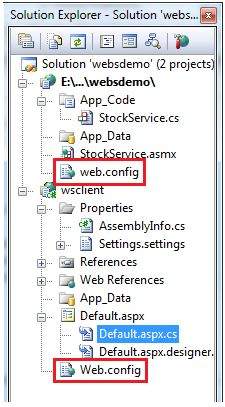
In this application, there are two web.config files for two projects i.e., the web service and the web site calling the web service.
The web.config file has the configuration element as the root node. Information inside this element is grouped into two main areas: the configuration section-handler declaration area, and the configuration section settings area.
The following code snippet shows the basic syntax of a configuration file:
<configuration>

   <!-- Configuration section-handler declaration area. -->
      <configSections>
         <section name="section1" type="section1Handler" />
         <section name="section2" type="section2Handler" />
      </configSections>
   <!-- Configuration section settings area. -->

   <section1>
      <s1Setting1 attribute1="attr1" />
   </section1>

   <section2>
      <s2Setting1 attribute1="attr1" />
   </section2>

   <system.web>
      <authentication mode="Windows" />
   </system.web>

</configuration>
Configuration Section Handler declarations
The configuration section handlers are contained within the <configSections> tags. Each configuration handler specifies name of a configuration section, contained within the file, which provides some configuration data. It has the following basic syntax:
<configSections>
   <section />
   <sectionGroup />
   <remove />
   <clear/>
</configSections>
It has the following elements:
- Clear - It removes all references to inherited sections and section groups.
- Remove - It removes a reference to an inherited section and section group.
- Section - It defines an association between a configuration section handler and a configuration element.
- Section group - It defines an association between a configuration section handler and a configuration section.
Application Settings
The application settings allow storing application-wide name-value pairs for read-only access. For example, you can define a custom application setting as:
<configuration>
   <appSettings>
      <add key="Application Name" value="MyApplication" />
   </appSettings>
</configuration>
For example, you can also store the name of a book and its ISBN number:
<configuration>
   <appSettings>
      <add key="appISBN" value="0-273-68726-3" />
      <add key="appBook" value="Corporate Finance" />
   </appSettings>
</configuration>
Connection Strings
The connection strings show which database connection strings are available to the website. For example:
<connectionStrings>
   <add name="ASPDotNetStepByStepConnectionString"
      connectionString="Provider=Microsoft.Jet.OLEDB.4.0;
      Data Source=E:\\projects\datacaching\ /
      datacaching\App_Data\ASPDotNetStepByStep.mdb"
      providerName="System.Data.OleDb" />

   <add name="booksConnectionString"
      connectionString="Provider=Microsoft.Jet.OLEDB.4.0;
      Data Source=C:\ \databinding\App_Data\books.mdb"
      providerName="System.Data.OleDb" />
</connectionStrings>
System.Web Element
The system.web element specifies the root element for the ASP.NET configuration section and contains configuration elements that configure ASP.NET Web applications and control how the applications behave.
It holds most of the configuration elements needed to be adjusted in common applications. The basic syntax for the element is as given:
<system.web>
   <anonymousIdentification>
   <authentication>
   <authorization>
   <browserCaps>
   <caching>
   <clientTarget>
   <compilation>
   <customErrors>
   <deployment>
   <deviceFilters>
   <globalization>
   <healthMonitoring>
   <hostingEnvironment>
   <httpCookies>
   <httpHandlers>
   <httpModules>
   <httpRuntime>
   <identity>
   <machineKey>
   <membership>
   <mobileControls>
   <pages>
   <processModel>
   <profile>
   <roleManager>
   <securityPolicy>
   <sessionPageState>
   <sessionState>
   <siteMap>
   <trace>
   <trust>
   <urlMappings>
   <webControls>
   <webParts>
   <webServices>
   <xhtmlConformance>
</system.web>
The following table provides brief description of some of common sub elements of the system.web element:
AnonymousIdentification
This is required to identify users who are not authenticated when authorization is required.
Authentication
It configures the authentication support. The basic syntax is as given:
<authentication mode="[Windows|Forms|Passport|None]">
   <forms>...</forms>
   <passport/>
</authentication>
Authorization
It configures the authorization support. The basic syntax is as given:
<authorization>
   <allow .../>
   <deny .../>
</authorization>
Caching
It Configures the cache settings. The basic syntax is as given:
<caching>
   <cache>...</cache>
   <outputCache>...</outputCache>
   <outputCacheSettings>...</outputCacheSettings>
   <sqlCacheDependency>...</sqlCacheDependency>
</caching>
CustomErrors
It defines custom error messages. The basic syntax is as given:
<customErrors defaultRedirect="url" mode="On|Off|RemoteOnly">
   <error. . ./>
</customErrors>
Deployment
It defines configuration settings used for deployment. The basic syntax is as follows:
<deployment retail="true|false" />
HostingEnvironment
It defines configuration settings for hosting environment. The basic syntax is as follows:
<hostingEnvironment idleTimeout="HH:MM:SS" shadowCopyBinAssemblies="true|false"
   shutdownTimeout="number" urlMetadataSlidingExpiration="HH:MM:SS" />
Identity
It configures the identity of the application. The basic syntax is as given:
<identity impersonate="true|false" userName="domain\username"
   password="<secure password>"/>
MachineKey
It configures keys to use for encryption and decryption of Forms authentication cookie data.
It also allows configuring a validation key that performs message authentication checks on view-state data and forms authentication tickets. The basic syntax is:
<machineKey validationKey="AutoGenerate,IsolateApps" [String]
   decryptionKey="AutoGenerate,IsolateApps" [String]
   validation="HMACSHA256" [SHA1 | MD5 | 3DES | AES | HMACSHA256 |
   HMACSHA384 | HMACSHA512 | alg:algorithm_name]
   decryption="Auto" [Auto | DES | 3DES | AES | alg:algorithm_name]
/>
Membership
This configures parameters of managing and authenticating user accounts. The basic syntax is:
<membership defaultProvider="provider name"
   userIsOnlineTimeWindow="number of minutes" hashAlgorithmType="SHA1">
   <providers>...</providers>
</membership>
Pages
It provides page-specific configurations. The basic syntax is:
<pages asyncTimeout="number" autoEventWireup="[True|False]"
      buffer="[True|False]" clientIDMode="[AutoID|Predictable|Static]"
      compilationMode="[Always|Auto|Never]"
      controlRenderingCompatibilityVersion="[3.5|4.0]"
      enableEventValidation="[True|False]"
      enableSessionState="[True|False|ReadOnly]"
      enableViewState="[True|False]"
      enableViewStateMac="[True|False]"
      maintainScrollPositionOnPostBack="[True|False]"
      masterPageFile="file path"
      maxPageStateFieldLength="number"
      pageBaseType="typename, assembly"
      pageParserFilterType="string"
      smartNavigation="[True|False]"
      styleSheetTheme="string"
      theme="string"
      userControlBaseType="typename"
      validateRequest="[True|False]"
      viewStateEncryptionMode="[Always|Auto|Never]" >

   <controls>...</controls>
   <namespaces>...</namespaces>
   <tagMapping>...</tagMapping>
   <ignoreDeviceFilters>...</ignoreDeviceFilters>
</pages>
Profile
It configures user profile parameters. The basic syntax is:
<profile enabled="true|false" inherits="fully qualified type reference"
   automaticSaveEnabled="true|false" defaultProvider="provider name">

   <properties>...</properties>
   <providers>...</providers>

</profile>
RoleManager
It configures settings for user roles. The basic syntax is:
<roleManager cacheRolesInCookie="true|false" cookieName="name"
   cookiePath="/" cookieProtection="All|Encryption|Validation|None"
   cookieRequireSSL="true|false " cookieSlidingExpiration="true|false "
   cookieTimeout="number of minutes" createPersistentCookie="true|false"
   defaultProvider="provider name" domain="cookie domain">
   enabled="true|false"
   maxCachedResults="maximum number of role names cached"

   <providers>...</providers>
</roleManager>
SecurityPolicy
It configures the security policy. The basic syntax is:
<securityPolicy>
   <trustLevel />
</securityPolicy>
UrlMappings
It defines mappings to hide the original URL and provide a more user friendly URL. The basic syntax is:
<urlMappings enabled="true|false">
   <add.../>
   <clear />
   <remove.../>
</urlMappings>
WebControls
It provides the name of shared location for client scripts. The basic syntax is:
<webControls clientScriptsLocation="String" />
WebServices
This configures the web services.
There are two categories of ASP.NET deployment:
- Local deployment : In this case, the entire application is contained within a virtual directory and all the contents and assemblies are contained within it and available to the application.
- Global deployment : In this case, assemblies are available to every application running on the server.
There are different techniques used for deployment, however, we will discuss the following most common and easiest ways of deployment:
- XCOPY deployment
- Copying a Website
- Creating a set up project
XCOPY Deployment
XCOPY deployment means making recursive copies of all the files to the target folder on the target machine. You can use any of the commonly used techniques:
- FTP transfer
- Using Server management tools that provide replication on a remote site
- MSI installer application
XCOPY deployment simply copies the application file to the production server and sets a virtual directory there. You need to set a virtual directory using the Internet Information Manager Microsoft Management Console (MMC snap-in).
Copying a Website
The Copy Web Site option is available in Visual Studio. It is available from the Website -> Copy Web Site menu option. This menu item allows copying the current web site to another local or remote location. It is a sort of integrated FTP tool.
Using this option, you connect to the target destination, select the desired copy mode:
- Overwrite
- Source to Target Files
- Sync UP Source And Target Projects
Then proceed with copying the files physically. Unlike the XCOPY deployment, this process of deployment is done from Visual Studio environment. However, there are following problems with both the above deployment methods:
- You pass on your source code.
- There is no pre-compilation and related error checking for the files.
- The initial page load will be slow.
Creating a Setup Project
In this method, you use Windows Installer and package your web applications so it is ready to deploy on the production server. Visual Studio allows you to build deployment packages. Let us test this on one of our existing project, say the data binding project.
Open the project and take the following steps:
Step (1) : Select File -> Add -> New Project with the website root directory highlighted in the Solution Explorer.
Step (2) : Select Setup and Deployment, under Other Project Types. Select Setup Wizard.
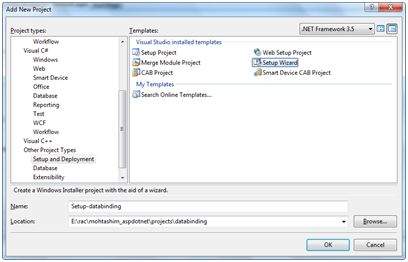
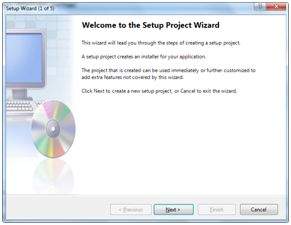
Step (3) : Choosing the default location ensures that the set up project will be located in its own folder under the root directory of the site. Click on okay to get the first splash screen of the wizard.
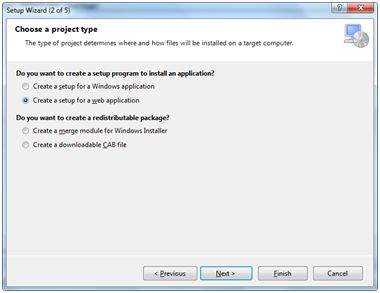
Step (4) : Choose a project type. Select 'Create a setup for a web application'.
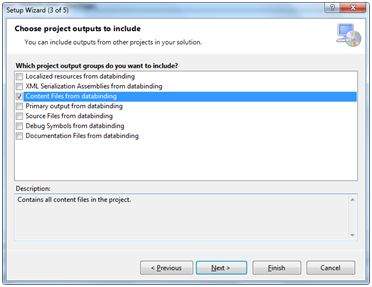
Step (5) : Next, the third screen asks to choose project outputs from all the projects in the solution. Check the check box next to 'Content Files from...'
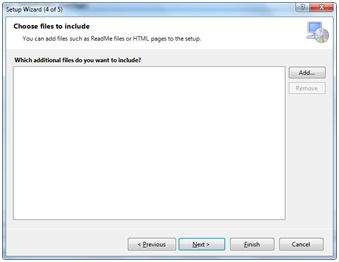
Step (6) : The fourth screen allows including other files like ReadMe. However, in our case there is no such file. Click on finish.
Step (7) : The final screen displays a summary of settings for the set up project.
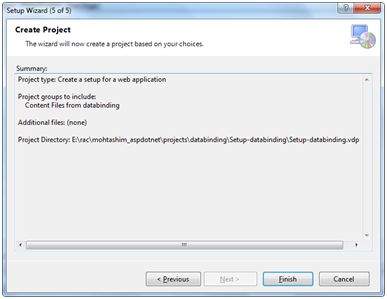
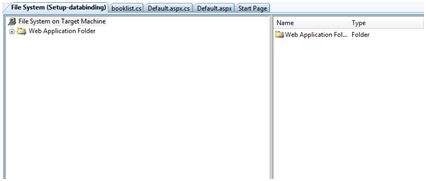
Step (8) : The Set up project is added to the Solution Explorer and the main design window shows a file system editor.
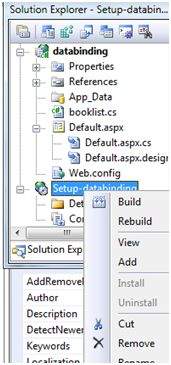
Step (9) : Next step is to build the setup project. Right click on the project name in the Solution Explorer and select Build.
Step (10) : When build is completed, you get the following message in the Output window:

Two files are created by the build process:
- Setup.exe
- Setup-databinding.msi
You need to copy these files to the server. Double-click the setup file to install the content of the .msi file on the local machine.

No comments:
Post a Comment