Monday 23 September 2013

Keyboard Shortcuts For Windows and Mac

Keyboard Shortcuts For Windows and Mac

Keyboard shortcuts are often used in modern operating systems and computer software programs.
Using keyboard shortcuts could save you a lot of time.

Basic Shortcuts


Description Windows Mac OS
Edit menu Alt + E Ctrl + F2 + F
File menu Alt + F Ctrl + F2 + E
View menu Alt + V Ctrl + F2 + V
Select all text Ctrl + A Cmd + A
Copy text Ctrl + C Cmd + C
Find text Ctrl + F Cmd + F
Find and replace text Ctrl + H Cmd + F
New Document Ctrl + N Cmd + N
Open a file Ctrl + O Cmd + O
Print options Ctrl + P Cmd + P
Save file Ctrl + S Cmd + S
Paste text Ctrl + V Cmd + V
Cut text Ctrl + X Cmd + X
Redo text Ctrl + Y Shift + Cmd + Z
Undo text Ctrl + Z Cmd + Z


Text Editing


Description Windows Mac OS
Cursor Movement
Go to the right or to the beginning of next line break Right Arrow Right Arrow
Go to the left or to the end of previous line break Left Arrow Left Arrow
Go up one row Up Arrow Up Arrow
Go down one row Down Arrow Down Arrow
Go to the beginning of the current line Home Cmd + Left Arrow
Go to the end of the current line End Cmd + Right Arrow
Go to the beginning of the document Ctrl + Home Cmd + Up Arrow
Go to the end of the document Ctrl + End Cmd + Down Arrow
Move up one frame Page Up Fn + Up Arrow
Move down one frame Page Down Fn + Down Arrow
Go to beginning of previous word Ctrl + Left Arrow Option + Left Arrow
Go to beginning of next word Ctrl + Right Arrow Option + Right Arrow
Go to beginning of line break Ctrl + Up Arrow Cmd + Left Arrow
Go to end of line break Ctrl + Down Arrow Cmd + Right Arrow
     
Text Selection
Select characters to the left Shift + Left Arrow Shift + Left Arrow
Select characters to the right Shift + Right Arrow Shift + Right Arrow
Select lines upwards Shift + Up Arrow Shift + Up Arrow
Select lines downwards Shift + Down Arrow Shift + Down Arrow
Select words to the left Shift + Ctrl + Left Shift + Opt + Left
Select words to the right Shift + Ctrl + Right Shift + Opt + Right
Select paragraphs to the left Shift + Ctrl + Up Shift + Opt + Up
Select paragraphs to the right Shift + Ctrl + Down Shift + Opt + Down
Select text between the cursor and the beginning of the current line Shift + Home Cmd + Shift + Left Arrow
Select text between the cursor and the end of the current line Shift + End Cmd + Shift + Right Arrow
Select text between the cursor and the beginning of the document Shift + Ctrl + Home Cmd + Shift + Up Arrow or Cmd + Shift + Fn + Left Arrow
Select text between the cursor and the end of the document Shift + Ctrl + End Cmd + Shift + Down Arrow or Cmd + Shift + Fn + Right Arrow
Select one frame at a time of text above the cursor Shift + Page Up Shift + Fn + Up Arrow
Select one frame at a time of text below the cursor Shift + Page Down Shift + Fn + Down Arrow
Select all text Ctrl + A Cmd + A
Find text Ctrl + F Cmd + F
     
Text Formatting
Make selected text bold Ctrl + B Cmd + B
Make selected text italic Ctrl + I Cmd + I
Underline selected text Ctrl + U Cmd + U
Make selected text superscript Ctrl + Shift + = Cmd + Shift + =
Make selected text subscript Ctrl + = Cmd + =
     
Text Editing
Delete characters to the left Backspace Backspace
Delete characters to the right Delete Fn + Backspace
Delete words to the right Ctrl + Del Cmd + Backspace
Delete words to the left Ctrl + Backspace Cmd + Fn + Backspace
Indent Tab Tab
Outdent Shift + Tab Shift + Tab
Copy text Ctrl + C Cmd + C
Find and replace text Ctrl + H Cmd + F
Paste text Ctrl + V Cmd + V
Cut text Ctrl + X Cmd + X
Redo text Ctrl + Y Shift + Cmd + Z
Undo text Ctrl + Z Cmd + Z


Web Browsers


Description Windows Mac OS
Navigation
Scroll down a frame Space or Page Down Space or Fn + Down Arrow
Scroll up a frame Shift + Space or Page Up Shift + Space or Fn + Up Arrow
Go to bottom of the page End Cmd + Down Arrow
Go to top of the page Home Cmd + Up Arrow
Go back Alt + Left Arrow or Backspace Cmd + Left Arrow
Go forward Alt + Right Arrow or Shift + Backspace Cmd + Right Arrow
Refresh a webpage F5 Cmd + R
Refresh a webpage (no cache) Ctrl + F5 Cmd + Shift + R
Stop Esc Esc
Toggle full-screen F11 Cmd + Shift + F
Zoom in Ctrl + + Cmd + +
Zoom out Ctrl + - Cmd + -
Zoom 100% (default) Ctrl + 0 Cmd + 0
Open homepage Alt + Home Option + Home or Option + Fn + Left Arrow
Find text Ctrl + F Cmd + F
     
Tab / Window Management
Open a new tab Ctrl + T Cmd + T
Close current tab Ctrl + W Cmd + W
Close all tabs Ctrl + Shift + W Cmd + Q
Close all tabs except the current tab Ctrl + Alt + F4 Cmd + Opt + W
Go to next tab Ctrl + Tab Control + Tab or Cmd + Shift + Right Arrow
Go to previous tab Ctrl + Shift + Tab Shift + Control + Tab or Cmd + Shift + Left Arrow
Go to a specific tab number Ctrl + 1-8 Cmd + 1-8
Go to the last tab Ctrl + 9 Cmd + 9
Reopen the last closed tab Ctrl + Shift + T Cmd + Shift + T
Open a new window Ctrl + N Cmd + N
Close current window Alt + F4 Cmd + W
Go to next window Alt + Tab Cmd + Tab
Go to previous window Alt + Shift + Tab Cmd + Shift + Tab
Reopen the last closed window Ctrl + Shift + N  
Open links in a new tab in the background Ctrl + Click Cmd + Click
Open links in a new tab in the foreground Ctrl + Shift + Click Cmd + Shift + Click
Print current webpage Ctrl + P Cmd + P
Save current webpage Ctrl + S Cmd + S
     
Address Bar
Cycle between toolbar, search bar, and page elements Tab Tab
Go to browser's address bar Ctrl + L or Alt + D Cmd + L
Focus and select the browser's search bar Ctrl + E Cmd + E / Cmd + K
Open the address bar location in a new tab Alt + Enter Opt + Enter
Display a list of previously typed addresses F4  
Add "www." to the beginning and ".com" to the end of the text typed in the address bar (e.g., type "w3schools" and press Ctrl + Enter to open "www.w3schools.com") Ctrl + Enter Cmd + Enter or Control + Enter
     
Bookmarks
Open the bookmarks menu Ctrl + B Cmd + B
Add bookmark for current page Ctrl + D Cmd + Opt + B or Cmd + Shift + B
Open browsing history Ctrl + H Cmd + Shift + H or Cmd + Y
Open download history Ctrl + J Cmd + J or Cmd + Shift + J


Screenshots


Description Windows Mac OS
Save screenshot of the whole screen as file   Cmd + Shift + 3
Copy screenshot of the whole screen to the clipboard PrtScr (Print Screen) or Ctrl + PrtScr Cmd + Ctrl + Shift + 3
Save screenshot of window as file   Cmd + Shift + 4, then Space
Copy screenshot of window to the clipboard Alt + PrtScr Cmd + Ctrl + Shift + 4, then Space
Copy screenshot of wanted area to the clipboard Cmd + Ctrl + Shift + 4
Save screenshot of wanted area as file   Cmd + Shift + 4

The ASCII Character Set HTML ASCII Reference

The ASCII character-set is used to send information between computers on the Internet.

The ASCII Character Set

ASCII stands for the "American Standard Code for Information Interchange".  It was designed in the early 60's, as a standard character-set for computers and hardware devices like teleprinters and tapedrives.
ASCII is a 7-bit character set containing 128 characters.
It contains the numbers from 0-9, the uppercase and lowercase English letters from A to Z, and some special characters.
The character-sets used in modern computers, HTML, and Internet are all based on ASCII.
The following table lists the 128 ASCII characters and their equivalent HTML entity codes.

ASCII Printable Characters

ASCII Character HTML Entity Code Description
    space
! ! exclamation mark
" " quotation mark
# # number sign
$ $ dollar sign
% % percent sign
& & ampersand
' ' apostrophe
( ( left parenthesis
) ) right parenthesis
* * asterisk
+ + plus sign
, , comma
- - hyphen
. . period
/ / slash
0 0 digit 0
1 1 digit 1
2 2 digit 2
3 3 digit 3
4 4 digit 4
5 5 digit 5
6 6 digit 6
7 7 digit 7
8 8 digit 8
9 9 digit 9
: : colon
; &#59; semicolon
< &#60; less-than
= &#61; equals-to
> &#62; greater-than
? &#63; question mark
@ &#64; at sign
A &#65; uppercase A
B &#66; uppercase B
C &#67; uppercase C
D &#68; uppercase D
E &#69; uppercase E
F &#70; uppercase F
G &#71; uppercase G
H &#72; uppercase H
I &#73; uppercase I
J &#74; uppercase J
K &#75; uppercase K
L &#76; uppercase L
M &#77; uppercase M
N &#78; uppercase N
O &#79; uppercase O
P &#80; uppercase P
Q &#81; uppercase Q
R &#82; uppercase R
S &#83; uppercase S
T &#84; uppercase T
U &#85; uppercase U
V &#86; uppercase V
W &#87; uppercase W
X &#88; uppercase X
Y &#89; uppercase Y
Z &#90; uppercase Z
[ &#91; left square bracket
\ &#92; backslash
] &#93; right square bracket
^ &#94; caret
_ &#95; underscore
` &#96; grave accent
a &#97; lowercase a
b &#98; lowercase b
c &#99; lowercase c
d &#100; lowercase d
e &#101; lowercase e
f &#102; lowercase f
g &#103; lowercase g
h &#104; lowercase h
i &#105; lowercase i
j &#106; lowercase j
k &#107; lowercase k
l &#108; lowercase l
m &#109; lowercase m
n &#110; lowercase n
o &#111; lowercase o
p &#112; lowercase p
q &#113; lowercase q
r &#114; lowercase r
s &#115; lowercase s
t &#116; lowercase t
u &#117; lowercase u
v &#118; lowercase v
w &#119; lowercase w
x &#120; lowercase x
y &#121; lowercase y
z &#122; lowercase z
{ &#123; left curly brace
| &#124; vertical bar
} &#125; right curly brace
~ &#126; tilde


ASCII Device Control Characters

The ASCII device control characters were originally designed to control hardware devices.
Control characters have nothing to do inside an HTML document.

ASCII Character HTML Entity Code Description
NUL &#00; null character
SOH &#01; start of header
STX &#02; start of text
ETX &#03; end of text
EOT &#04; end of transmission
ENQ &#05; enquiry
ACK &#06; acknowledge
BEL &#07; bell (ring)
BS &#08; backspace
HT &#09; horizontal tab
LF &#10; line feed
VT &#11; vertical tab
FF &#12; form feed
CR &#13; carriage return
SO &#14; shift out
SI &#15; shift in
DLE &#16; data link escape
DC1 &#17; device control 1
DC2 &#18; device control 2
DC3 &#19; device control 3
DC4 &#20; device control 4
NAK &#21; negative acknowledge
SYN &#22; synchronize
ETB &#23; end transmission block
CAN &#24; cancel
EM &#25; end of medium
SUB &#26; substitute
ESC &#27; escape
FS &#28; file separator
GS &#29; group separator
RS &#30; record separator
US &#31; unit separator
     
DEL &#127; delete (rubout)

Wednesday 18 September 2013

YOU CAN WIN By Shiv Khera

YOU CAN WIN
By
Shiv Khera

WINNERS VERSUS LOSERS

The Winner is always part of the answer;
 The Loser is always part of the problem.
The Winner always has a program;
 The Loser always has an excuse.
The Winner says, "Let me do it for you";
 The Loser says, "That is not my job."
The Winner sees an answer for every problem;
 The Loser sees a problem for every answer.
The Winner says, "It may be difficult but it is possible";
 The Loser says, "It may be possible but it is too difficult."
When a Winner makes a mistake, he says, "I was wrong";

When a Loser makes a mistake, he says, "It wasn't my fault."

A Winner makes commitments;
 A Loser makes promises.
Winners have dreams;
 Losers have schemes.
Winners say, "I must do something";
 Losers say, "Something must be done."
Winners are a part of the team;
 Losers are apart from the team.
Winners see the gain;
 Losers see the pain.
Winners see possibilities;
 Losers see problems.
Winners believe in win-win;
 Losers believe for them to win someone has to lose.
Winners see the potential;
 Losers see the past.
Winners are like a thermostat;
 Losers are like thermometers.
Winners choose what they say;
 Losers say what they choose.
Winners use hard arguments but soft words;
 Losers use soft arguments but hard words.
Winners stand firm on values but compromise on petty things
Winners follow the philosophy of empathy: "Don't do to others what you would not
want them to do to you";
 Losers follow the philosophy, "Do it to others before they do it to you."
Winners make it happen;
 Losers let it happen.
Winners plan and prepare to win.
 The key word is preparation.

How to remove autorun recycler virus completely

How to remove autorun recycler virus completely


How to remove autorun recycler virus completely

autorun.inf folder in driveSometimes, you may see an Recycler folder in the root of each drive in USB drives or
hard disk and you may treat it as recycler virus. The Recycler folder is an system folder that used to keep the deleted files, when you want to recover the deleted data before, the system will recover them from the Recyclers folder. You can click into the folder, and find the deleted files, picture, folders in it.
deleted files in recyclerThe attribute of Recycler folder is hidden, only when the 'show hidden files and folders' option is checked, you can see it.
Also System Volume Information is a system folder, it save the system restoration information.

However, more and more autorun virus hide themselves in the recycler bin folder, if you find any executable file such as RECYCLER.exe, or vbs file in it, and autorun.inf file in the root of the drive, and the content as
[AutoRun]
open=RECYCLER.exe
shellexecute=RECYCLER.exe
shell\Auto\command=RECYCLE.exe
recycler.exe
That means your computer and USB sticks have been infected with virus.

Remove viruses in Recycler folder

Update antivirus software such as AVG, kaspersky, Nod32 to the latest version, do a thorough scan of the computer and USB storage devices. If the virus/worms come back again after removal, or the antivirus software could not detect the virus even, try to remove the virus manually.
  1. Reboot your system and tap F8 to enter safe mode;
  2. Close the RECYCLER.exe process in the task manager;
  3. Delete the autorun.inf and other suspicious exe files in the recycler folder
  4. Open registry editor and modify the NoDriveTypeAutoRun key with 03ffffff in following key: HKEY_LOCAL_MACHINE\SOFTWARE\ and HKEY_CURRENT_USER\SOFTWARE
  5. Using the antivirus product to scan again.
The manual removal of the infection is not recommended because it requires an expertise to edit registry. In case you modify a registry entry wrongly, that may cause damage to the system. Therefore, it is always better to remove virus with a specialized removal tool.

Using Recycler Virus Removal Tool to delete the virus automatically

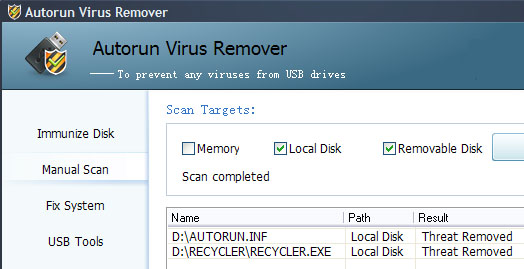
Autorun Remover is a specialized autorun removal tool to clean the autorun type virus including recycler virus, with it, you can get rid of the autorun.inf and recycler.exe easily and quickly.
  1. Download and install Autorun Virus Remover;
  2. if you USB drives has autorun.inf folder in it, insert it into computer;
  3. Execute the tool, Click 'Start' to execute the scan.
  recycler virus removal
If Autorun Remover is blocked by the recyclers virus then run system in safe mode and try again. To do this reboot your system and tap F8 repeatedly when system starts up.
Autorun Virus Remover is the most effectively autorun antivirus software in the market, with the product, it is an easy job for you to block any autorun.inf virus from USB drives, click to get more information about it.

REMOVE VIRUSES IN RECYCLER FOLDER AND SYSTEM VOLUME INFORMATION FOLDER

REMOVE VIRUSES IN RECYCLER FOLDER AND SYSTEM VOLUME INFORMATION FOLDER

Here is a  simple and easy sequence of  instructions on how to remove viruses the "recycler"  folder and System Volume Information folder  in windows XP ..... Your drives will have such folders as the ones below  . e.g if its c:

in case you attempt to delete either ..... you get  these annoying message box .........

FIRST ......TO DELETE  RECYCLER FOLDER ...... Follow these .....
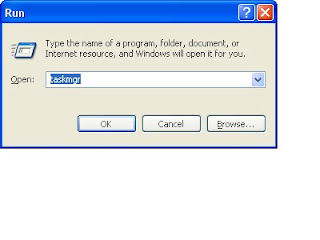
1. Access the Task Manager >>> this can be done by ge ....Start > go to  Run ......... and type Taskmgr on the run Prompt as shown below
 2. The Task Manager will Pop Up as shown below  and kill  the process called Ctfmon.exe

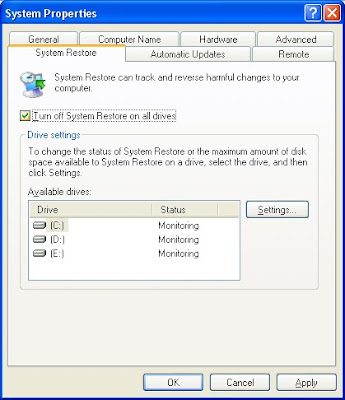
 3. Right click on My computer Icon  and go to properties  and after the pop below go toSystem Restore  Tab and tick  the  "Turn System Restore on all Drives" check box as shown below and  Click Apply  button and then Ok


 4. Delete the RECYCLER FOLDER in each drive (e.g in my Scenario I would  delete in C,D, and  E) and empty  the recycle bin .... Alternatively Shift + Delete  the folder in each drive.

After These the RECYCLER FOLDER is GONE......GONE ...GONE......!

SECONDLY  ..... TO ACCESS THE AND DELETE THE CONTENT OF  SYSTEM VOLUME INFORMATION FOLDER

Note: its advised you only delete the content of these folder not the folder itself ..... it will be recreated  by windows after the rebooting.
here are the steps 
  1. Click Start, and then click My Computer.
  2. On the Tools menu, click Folder Options.
  3. On the View tab, click Show hidden files and folders.
  4. Clear the Hide protected operating system files (Recommended) check box. Click Yes when you are prompted to confirm the change.
  5. Clear the Use simple file sharing (Recommended) check box.
  6. Click OK.
  7. Right-click the System Volume Information folder in the root folder, and then click Properties.
  8. Click the Security tab.
  9. Click Add, and then type the name of the user to whom you want to give access to the folder. Typically, this is the account with which you are logged on. Give the user full control if not access Click OK, and then click OK again.
  10. Double-click the System Volume Information folder in the root folder to open it.
  11. Delete the content of these System Volume Information folder in each drive ...... or Delete the folder itself ...... It will recreated a fresh and virus free ......
Hope this helps ........ In case you need more .......ask

How To Remove Autorun Recycler Virus from Windows


How To Remove Autorun Recycler Virus from Windows
Sometimes you might find a folder called recycler in the root directory of all disks available on your computer (Mainly in hard disk drives and USB drives). 
Most people have a misconception that recycler is a Computer Virus, however its not true. The recycler is nothing but a system folder which is used to keep all deleted data.
In simple words, it means if you delete anything on your D drive then the data will be moved inside a hidden folder called recycler which is in the root directory of D drive. If you open this folder, you can find all deleted images, files, videos, etc.
Recycler Virus with System Volume Information
Along with recycler you can find another folder called System Volume Information. It contains the system restoration information.
The recycler and system volume information folders have the attribute ‘hidden’ by default in Windows XP. So you can only see them if you choose to Show Hidden Files and Folders in Windows XP.
But in Windows 8, these folders have a new name as well as new stealth mode. So these folders are not visible even if you choose to ‘Show Hidden files and folders in Windows 8′.

But recycler is a virus, isn’t it ?

Recycler Virus ExampleSometimes autorun viruses hide themselves inside recycler folder. If you find any executable file such as RECYCLER.exe then that particular file is a virus. Also if your computer is infected with a recycler.exe virus, you might find a vbs file or an autorun file with the following content in it:
[AutoRun]
open=RECYCLER.exe
shellexecute=RECYCLER.exe
shell\Auto\command=RECYCLE.exe
If you encounter these type of files, then your computer might be infected with a recycler virus. But remember that the recycler folder is not itself a virus. Its a system folder.

Should I Delete Recycler?

As i said, its a system folder. And it is required by the system. So if you try and delete it. It will again appear on a system reboot. You don’t need to delete the recycler folder or the system volume information folder. Remember that recycler folder is a system folder while recycler.exe is the recycler virus which you should delete.

So How Do I Delete RECYCLER.exe ?

First of all, do not execute any instance of recycler virus ( recycler.exe ). This particular file is an executable file with a ‘folder’ icon. So you might double click on it with the intention of opening the folder. But it turns out to be a process. So when you double click, the virus is executed and remains active. It adds itself to your Windows startup programs list. And thus the recycler virus will be executed each time you run the Operating System.
If recycler virus is active, then no matter how many times you delete it, it will re-appear and create a copy of itself everywhere on the disk drive.
  1. So first Kill the process by opening Task Manager.
  2. Open task manager(right click on taskbar, select task manager). Go in processes tab
  3. Find recycler.exe
  4. Right click on it and click end process
  5. Open start menu > run > type msconfig > hit enter > go to startup tab.
  6. If recycler.exe is present in the list, then uncheck it.
  7. Open start menu > all programs > startup folder.
  8. If you find recycler.exe there, then delete it.
  9. Boot your computer in Safe Mode by hitting “F8″ until the “Advanced Boot Options” menu appears. Select “Safe Mode” from the prompt.
  10. Now search your computer for recycler.exe
  11. And delete each and every instance of it if you find any.
  12. Restart your computer.
  13. And install a proper Anti-virus or Anti-malware.
There are other methods to remove recycler virus, but it involves messing with the system registry. But i prefer the graphical method rather than registry and command line.
And it works, if it doesn’t then either you didn’t do it right or its not at all a recycler virus ( recycler.exe ). But if you need any help, comment on this thread below and i will try and help asap.

Tuesday 17 September 2013

History of Lucknow

History of Lucknow

Avadh is claimed to be among the most ancient of Hindu states. According to popular legend, Ramchandra of Ayodhya, the hero of the Ramayana, gifted,the territory of Lucknow to his devoted brother Lakshman after he had conquered Sri Lanka and completed his term of exile in the jungle. Therefore, people say that the original name of Lucknow was Lakshmanpur, popularly known as Lakhanpur or Lachmanpur. The city of Ayodhya itself, forty miles away from Lakshmanpur, was reported to be full of great riches: "Its streets, well arranged, were refreshed with ceaseless streams of water ~ its walls, variously ornamented, resembled the checkered surface of a chess-board. It was filled with merchants, dramatists, elephants, horses and chariots. The cloud of fragrant incense darkened the sun at noonday: but the glowing radiance of the resplendent diamonds and jewels that adorned the persons of the ladies relieved the gloom!.." (Ramayana). The ancient metropolis of Ayodhya was situated on the banks of the Ghagra, a river as wide as the Ganges at Chunar and its extensive ruins can still be seen. There is no record of when and how Ayodhya came to be deserted or allowed to decay : the legend is that Rama ascended to heaven, carrying with him all the population of the place. So large had the city been that Lakshmanpur was described as its suburb! Taking a descent through the mists of time we alight upon Ayodhya again in the record books of the Emperor Akbar. It is a prodigious descent in time -from fifteen centuries before the Christian era to fifteen centuries after. Incredibly though, not much is known about the history of Avadh during this time. We know that after the conquest of Kanauj by the Afghans at the. end of the twelfth century, Avadh submitted to the Sultan of Ghazni, and so became part of the empire of Delhi. Avadh then as- serted its independence for a while under a Muslim ruler, but he was over- thrown by Babur, and Avadh became a subah or province of the Moghul empire. As the Moghul power declined and the emperors lost their paramountcy and they became first the puppets and then the prisoners of their feudatories, so Avadh grew stronger and more independent.
Its capital city was Faizabad. Of all the Muslim states and dependencies of the Moghul empire, Avadh had the newest royal family. They were descended from a Persian adventurer called Sadat Khan, originally from Khurasan in Persia. There were many Khurasanis in the service of the Moghuls, mostly soldiers, and if successful, they could hope for rich rewards. Sadat Khan proved to be amongst the most successful of this group. In 1732, he was made governor of the province of Avadh. His original title was Nazim, which means Governor, but soon he was made Nawab. In 1740, the Nawab was called Wazir or vizier, which means Chief Minister, and thereafter he was known as the Nawab Wazir. In practice, from Sadat Khan onwards, the titles had been hereditary, though in theory they were in the gift of the Moghul emperor, to whom allegiance was paid. A nazar, or token tribute, was sent each year to Delhi, and members of the imperial family were treated with great deference: two of them actually lived in Lucknow after 1819, and were treated with great courtesy. Achieving a certain degree of independence from the Moghuls in Delhi did not, unfortunately, mean that the Nawabs could rule entirely as they pleased. They had merely exchanged one master for another. The British, in the form of the East India Company based in Calcutta, had long looked with predatory eyes at the wealth of Avadh. Excuses for interference in the province were not hard to find. The most catastrophic from the Avadh point of view came when Shuja-ud-Daula invaded Bengal, and actually briefly held Calcutta. But British military victories at Plassey in 1757 and Buxar in 1764 utterly routed the Nawab. When peace was made, Avadh had lost much land. But the enemies became friends, on the surface anyway, and the Nawab Wazir was extolled in the British Parliament as the Chief native allay of the East India Company in all India. The Nawabs surrendered their independence little by little over many years. To pay for the protection of British forces and assistance in war, Avadh gave up first the fort of Chunar, then the districts of Benares and Ghazipur , then the fort at Allahabad; all the time the cash subsidy which the Nawab paid to the Company grew and grew. In 1773, the fatal step was taken by the Nawab of accepting a British Resident at Lucknow, and surrendering to the Company all control over foreign policy. Soon the Resident, however much he might defer ceremonially to the Nawab, became the real ruler. Asaf -ud-Daula, son of Shuja-ud- Daula, moved the capital from Faizabad to Lucknow in 1775 and made it one of the most prosperous and glittering cities in all India. Why did he move? On a whim, it is said, because he wanted to get away from the control of a dominant mother. On such a thread did the fate of the great city of Lucknow depend! Nawab Asaf-ud-Daula was a generous and sympathetic ruler, an inveterate builder of monuments and a discriminate patron of the arts. He built the Bara Imambara with its intricate bhul-bhulayya and adjoining mosque, primarily to create employment for his subjects during a time of drought. The Rumi Darwaza also testifies to his architectural zeal. His son, Wazir Ali, was the one who most regretted his grandfather's ac- ceptance of a British resident at Lucknow. In 1798, the Governor-General removed him from the throne, on the excuse that there was doubt as to whether he was a true son of Asaf-ud- Daula, but more probably because he was displaying tendencies to independence. They put Asafs brother, Sadat Ali Khan, on the throne. Sadat Ali Khan, though economical in fiscal management, was nevertheless an enthusiastic builder and commissioned many grand palaces, including Dilkusha, Hayat Baksh and Farhat Baksh, as well as the famous Lal Baradari. Hereafter the dynasty had to look to Calcutta rather than to Delhi to settle the succession. The assassination of a British Resident in 1798 in Benares by the deposed Wazir Ali gave further excuse for interference, and Lord Wellesley (brother of the Duke of Wellington) was just the man to exploit it.
By the treaty of 1801, the Nawab had to give up his own army, and pay heavily for a British-led one in its place. The southern doab (Rohilkhand) was ceded, and the remainder of the district of Allahabad and other areas became part of British India. In thirty years, Avadh had lost half its territory to the British. The Nawab demanded in return for these concessions that he should have a free hand in governing his remaining territory, unchecked by the advice or interference of the British. But in this, he was badly handicapped by the fact that he had to rely on British troops to enforce his orders. Wellesley had another trick up his sleeve: a clause of the treaty by which the Nawab under- took to establish a system of administration "by the advice of and acting in conformity to the counsel of the officers of the Honourable Company" which should be conducive to the prosperity of his subjects. It seemed a harmless clause, but was to be the means by which the British eventually annexed Avadh. Thus, from 1819 onwards, things ran their course in Avadh. Sadat Ali being gathered to his fathers, Ghazi his son, sat on the musnud, the throne, and took the cognomen "ud-Din", implying Defender of the Faith. He was formally invested with the title of King by the British, though ironically the proclamation of kingship coincided with a period of almost complete dependence on the British. He lent two millions of rupees to the British feringhee for the Nepal War, and at its close got the Nepalese Terai ~ a marshy forest extending along the foot of the Himalayas -in liquidation of half the debt. Some might have thought it a poor bargain, but in fact the Terai eventually produced some very valuable timber. Ghazi-ud-Din was a good monarch, responsible for much building and public works of all kinds, and he paid due attention to the administration of justice. He built the Mubarak Manzil and Shah Manzil as well as Hazari Bagh, in whjch he introduced Lucknow society to the sport of animal contests for the first time.
However, his son Nasir -ud-Din who succeeded to the throne, had an attachment to the English, not founded upon those things the English would like to be admired for -justice, liberty, democracy -but upon their dress, their eating habits and, more unfortunately, the drinking -habits of the more disreputable element of English adventurer with whom he surrounded himself. Nasir -ud-Din, despite such a temperament, was a popular monarch, who was responsible for the construction of an astrological centre, Tarunvali Kothi. Equipped with sophisticated instruments, it was entrusted to the care of a British astronomer. When he died there was another disputed succession and the British insisted on Muhammed Ali, another son of Sadat Ali, being enthroned. Muhammed Ali was a just and popular ruler and under him, Lucknow regained its splendour for a brief spell. He was however sorely troubled by rheumatism. He died in 1842 and his son Arnjad Ali succeeded, a man more inclined towards matters religious and spiritual, leading to the neglect of governance.

He was succeeded by Wajid Ali Shah, poet, singer, avid patron of the arts and lover of Lucknow. Of him it was written, "He is entirely taken up in the pursuit of his personal gratifications. He has no desire to be thought to take any interest whatever in public affairs and is altogether regardless of the duties and responsibilities of his high office. He lives exclusively in the society of fiddlers, eunuchs and women: he has done so since his childhood, and is likely to do so till his last." ('The Private Life of an Eastern King' by William Knighton.) This portrait of Wajid Ali Shah was used to justify British annexation of Avadh. If the charges of mismanagement levied against Wajid Ali Shah were true, the British were as much responsible for this as the Nawab. They were more in control of the administration and finances of Avadh since the 1780's than the Nawab. In addition, Avadh had been impoverished by the incessant cash demands of the British on the Nawab. The excuse at last came for the British to invoke that clause of the 1801 Treaty. And the Governor General in 1856, Lord Dalhousie, was just the man to do it. Avadh was annexed, Wajid Ali Shah shipped off to virtual imprisonment in Matiyaburj in Calcutta and, though this was not on the British programme, the stage set for the greatest rebellion to date against their power in India. One of Wajid Ali Shah's wives, the Begum Hazrat Mahal, remained in Lucknow, and when the Mutiny came in 1857, she put herself at the head of those fighting for freedom. The Begum never did surrender, she died in Nepal in 1879.

Types of Dinosaurs Types of Dinosaurs

Fun Dinosaur Facts for Kids
Learn about different types of dinosaursTypes of Dinosaurs
How many types of dinosaurs do you know? Check out our list of dinosaur kinds for kids which includes some of the most well known types of dinosaurs.
From ferocious Theropods such as the Tyrannosaurus rex and Spinosaurus to huge Sauropods such as the Diplodocus and Brachiosaurus. Read on and find out where your favorite dinosaur fits in while enjoying some fun facts.


In 1888, a man named Harry Seeley proposed a way of classifying dinosaurs into two groups by looking at their hip structure, these groups are called Saurischia (lizard hipped) and Ornithischia (bird hipped). The two groups can be further broken down into sub-groups such as families, sub-families and so on. Let’s take a look at some of the interesting sub-groups and examples of the dinosaurs that are part of them.

Saurischia (lizard hipped dinosaurs)
Theropods - The name Theropod means ‘beast foot’ and this group includes all of the carnivorous (meat eating) dinosaurs. Although it might be surprising, birds actually evolved from Theropods rather than from Ornithischian (bird hipped) dinosaurs. Theropods moved on two legs and include a number of scary looking but popular dinosaurs such as Tyrannosaurus rex and Velociraptor.
Sauropods - Sauropods evolved to walk on four legs and typically grew to enormous sizes. They were herbivores (plant eaters) and included classic dinosaurs such as the Diplodocus and Brachiosaurus.

Ornithiscia (bird hipped dinosaurs)
Thyreophora - The name Thyreophora means ‘shield bearers’ and this group includes armored dinosaurs such as the Stegosaurus and Ankylosaurus. They were herbivores that lived from the early Jurassic Period to the late Cretaceous.
Cerapods - Cerapods included a variety of interesting groups such as Ceratopsian (horned faced) dinosaurs like the Triceratops as well as Ornithopods (bird footed) dinosaurs like the Iguanodon.

Ten Study Methods That Work

Ten Study Methods That Work

Studying effectively is not a matter of chance. Educators and psychologists have researched study methods for years. Some of the best studies come from the top universities: Stanford, Indiana, and Chicago where precise experiments with student groups have shed light on the most effective study methods. Students who follow these methods learn more easily, retain material for longer periods of time, and save themselves hours of study time. The ten study methods researchers have found that work are:

1. Making and Keeping a Study Schedule

Set aside certain hours of each day for study just as you do for nourishment and sleep. Keep the same schedule faithfully from day-to-day. The amount of time needed for study will vary for each individual based on skills with the subject matter. An average of two hours of study each day for each hour in class is recommended. Going to class is only the beginning; the real work begins afterwards!

2. Studying in an Appropriate Setting — Same Time, Same Place, Every Day

If concentration is your problem, then the right surroundings will help you greatly. Your study desk or table should be in a quiet place – free from as many distractions as possible. You will concentrate better when you study in the same place every day. It’s a mind set. For example, when you sit down at the kitchen table, you expect to eat. When you sit down in an easy chair, you watch TV, etc. Developing the habit of studying in the same place at the same time everyday will improve your concentration.

3. Equipping Your Study Area With All the Materials You Need

Your study desk or table should be equipped with all the materials you might need to complete the assignment, e.g., pencils, pens, erasers, paper clips, stapler, dictionary, snacks, and liquid refreshments, etc. For some assignments, you may require a calculator or other supplies. With your materials at hand, you can study without interruption. If you have an answering machine, let it do its job during your study time. You can return the calls after you have finished studying. Taking your snack food and drinks to the study location will eliminate those endless trips to the kitchen which break your concentration.

4. Not Relying on Inspiration for Motivation

Can you imagine an athlete-in-training waiting for inspiration to strike to practice in preparation for an event? Of course not. They train daily to stay competitive whether they want to or not. Like the athlete, you must get in training for tests and examinations by doing the assignments and preparing daily through review to be ready for the action.

5. Keeping a Well-Kept Notebook Improves Grades

Researchers tell us that there is definitely a relationship between orderliness and high grades. Knowing where to find your materials when you need them is crucial. Keep a special section for each subject in your notebook as well as a semester calendar so that you can write down all important assignments as they are announced. Having all of this information together in one place is vital to your success. A well-kept notebook is a part of good time management. If you’ve ever misplaced an important assignment, you know how much valuable time can be lost looking for it.

6. Keeping a Careful Record of Assignments

Put it down in black and white—including the details—and keep it in your notebook. Knowing just what you are expected to do and when you are expected to do it is the first giant step toward completing important assignments successfully and on time.

7. Making Use of “Trade Secrets”

Flash cards aren’t just for kids! They are a legitimate study tool. Use the front of the card to write an important term, and on the back, write a definition or an important fact about that term. Carry your flash cards with you. Use them during “dead time,” such as standing in a check-out line, waiting in a doctor or dentist’s office, riding a bus, or waiting at the Laundromat. Keep a set in the glove compartment of your car for long lines at your favorite fast food drive-in restaurant or bank. Post them on your bathroom mirror to review while shaving or applying make-up. You’ll be surprised how much you can accomplish during those otherwise “dead times.” Think about developing your own “trade secrets” that will improve your study skills.

8. Taking Good Notes as Insurance Against Forgetting

Learn to take good notes efficiently as your instructors stress important points in class and as you study your assignments. Good notes are a “must” for just-before-test-reviewing. Without notes, you will need to reread and review the entire assignment before a test. This may require you to read anywhere from 100-300 pages of material in one sitting. With notes, you can recall the main points in just a fraction of the time. The time you spend in note taking is not lost, but in fact, is a time-saver.

9. Overlearning Material Enhances Memory

Psychologists tell us that the secret to learning for future reference is overlearning. Experts suggest that after you can say, “I know this material,” that you should continue to study that material for an additional one-fourth of the original study time. The alphabet is an example of overlearning. How did you learn it? Probably through recitation which is the best way to etch material into the memory trace. Manipulate the material as many different ways as possible by writing, reading, touching, hearing, and saying it. In an experimental study, students who overlearned material retained four times as much after a month than students who didn’t overlearn.

10. Reviewing Material Frequently

A student who does not review material can forget 80% of what has been learned in only two weeks! The first review should come very shortly after the material was first presented and studied. Reviewing early acts as a safeguard against forgetting and helps you remember far longer. Frequent reviews throughout the course will bring rewards at test time and will alleviate pre-test anxiety.
Although these ten study methods do work, there is one other component needed when using all of them – taking responsibility for studying by following through on assignments. All the study methods in the world won’t help you if you don’t help yourself. As with most everything in your life, your motto should be, “I’m responsible for my success!”

If you put forth the effort to study effectively, the improved skills will soon become a habit and be just as natural as breathing. The result can be better grades, greater knowledge, and higher self-esteem. These skills will also serve you well in your professional and personal life

Exam Preparation: Ten Study Tips

Exam Preparation: Ten Study Tips

Exam Preparation: Ten Study Tips

Preparing for exams? Give yourself the best chance with these top ten study tips.

1. Give yourself enough time to study

Don't leave it until the last minute. While some students do seem to thrive on last-minute 'cramming', it's widely accepted that for most of us, this is not the best way to approach an exam. Set out a timetable for your study. Write down how many exams you have and the days on which you have to sit them. Then organize your study accordingly. You may want to give some exams more study time than others, so find a balance that you feel comfortable with. 

2. Organize your study space

Make sure you have enough space to spread your textbooks and notes out. Have you got enough light? Is your chair comfortable? Are your computer games out of sight?
Try and get rid of all distractions, and make sure you feel as comfortable and able to focus as possible. For some people, this may mean almost complete silence; for others, background music helps. Some of us need everything completely tidy and organized in order to concentrate, while others thrive in a more cluttered environment. Think about what works for you, and take the time to get it right.

3Use flow charts and diagrams

Visual aids can be really helpful when revising. At the start of a topic, challenge yourself to write down everything you already know about a topic - and then highlight where the gaps lie. Closer to the exam, condense your revision notes into one-page diagrams. Getting your ideas down in this brief format can then help you to quickly recall everything you need to know during the exam.

4. Practice on old exams

One of the most effective ways to prepare for exams is to practice taking past versions. This helps you get used to the format of the questions, and - if you time yourself - can also be good practice for making sure you spend the right amount of time on each section.

5. Explain your answers to others

Parents and little brothers and sisters don't have to be annoying around exam time! Use them to your advantage. Explain an answer to a question to them. That will help you to get it clear in your head, and also to highlight any areas where you need more work.

6. Organize study groups with friends

Get together with friends for a study session. You may have questions that they have the answers to and vice versa. As long as you make sure you stay focused on the topic for an agreed amount of time, this can be one of the most effective ways to challenge yourself.

7. Take regular breaks

While you may think it's best to study for as many hours as possible, this can actually be counterproductive. If you were training for a marathon, you wouldn't try and run 24 hours a day! Likewise studies have shown that for long-term retention of knowledge, taking regular breaks really helps.
Everyone's different, so develop a study routine that works for you. If you study better in the morning, start early before taking a break at lunchtime. Or if you're more productive at nighttime, take a larger break earlier on so you're ready to settle down come evening.
Try not to feel guilty about being out enjoying the sunshine instead of hunched over your textbooks. Remember Vitamin D is important for a healthy brain!

8. Snack on 'brain food'

Keep away from junk food! You may feel like you deserve a treat, or that you don't have time to cook, but what you eat can really have an impact on energy levels and focus. Keep your body and brain well-fuelled by choosing nutritious foods that have been proven to aid concentration and memory, such as fish, nuts, seeds, yogurt and blueberries. The same applies on exam day - eat a good meal before the test, based on foods that will provide a slow release of energy throughout. Sugar may seem appealing, but it won't help when your energy levels crash an hour or so later.

9. Plan your exam day

Make sure you get everything ready well in advance of the exam - don't leave it to the day before to suddenly realize you don't know the way, or what you're supposed to bring. Check all the rules and requirements, and plan your route and journey time. If possible, do a test run of the trip; if not, write down clear directions.
Work out how long it will take to get there - then add on some extra time. You really don't want to arrive having had to run halfway or feeling frazzled from losing your way. You could also make plans to travel to the exam with friends or classmates, as long as you know they're likely to be punctual! 

10. Drink plenty of water

As a final tip, remember that being well hydrated is essential for your brain to work at its best. Make sure you keep drinking plenty of water throughout your revision, and also on the exam day.
Good luck!

Featured post

Life Infotech now a leading brand in the field of technology training

  Life Infotech now a leading brand in the field of technology training & its invites students around the nation to be a part of the Tra...