Tuesday 27 May 2014

What is Stored Procedure? What is Trigger? What is View? What is cursors? What is a Linked Server?

What is Stored Procedure?
A stored procedure is a named group of SQL statements that have been previously created and stored in the server database. Stored procedures accept input parameters so that a single procedure can be used over the network by several clients using different input data. And when the procedure is modified, all clients automatically get the new version. Stored procedures reduce network traffic and improve performance. Stored procedures can be used to help ensure the integrity of the database.e.g. sp_helpdb, sp_renamedb, sp_depends etc.
SYNATX   Create Proc Proc_Name
//declaring variables
@variable_name  data_type =value
As
Begin
//Body of SP.
End
What is Trigger?
A trigger is a SQL procedure that initiates an action when an event (INSERT, DELETE or UPDATE)occurs. Triggers are stored in and managed by the DBMS.Triggers are used to maintain the referential integrity of data by changing the data in a systematic fashion. A trigger cannot be called or executed; the DBMS automatically fires the trigger as a result of a data modification to the associated table.Triggers can be viewed as similar to stored procedures in that both consist of procedural logic that is stored at the database level. Stored procedures, however, are not event-drive and are not attached to a specific table as triggers are. Stored procedures are explicitly executed by invoking a CALL to the
procedure while triggers are implicitly executed. In addition, triggers can also execute stored procedures.
Nested Trigger: A trigger can also contain INSERT, UPDATE and DELETE logic within itself, so when the trigger is fired because of data modification it can also cause another data modification, thereby firing another trigger. A trigger that contains data modification logic within itself is called a nested trigger.
What is View?
A simple view can be thought of as a subset of a table. It can be used for retrieving data, as well as updating or deleting rows. Rows updated or deleted in the view are updated or deleted in the table the  view was created with. It should also be noted that as data in the original table changes, so does data in the view, as views are the way to look at part of the original table. The results of using a view are not permanently stored in the database. The data accessed through a view is actually constructed using standard T-SQL select command and can come from one to many different base tables or even other views.
What is cursors?
Cursor is a database object used by applications to manipulate data in a set on a row-by-row basis, instead of the typical SQL commands that operate on all the rows in the set at one time. In order to work with a cursor we need to perform some steps in the following order: Declare cursor
Open cursor
Fetch row from the cursor
Process fetched row
Close cursor
Deallocate cursor
What is a Linked Server?
Linked Servers is a concept in SQL Server by which we can add other SQL Server to a Group and query both the SQL Server dbs using T-SQL Statements. With a linked server, you can create very clean, easy to follow, SQL statements that allow remote data to be retrieved, joined and combined with local data. Storped Procedure sp_addlinkedserver, sp_addlinkedsrvlogin will be used add new Linked Server.
What is Collation?
Collation refers to a set of rules that determine how data is sorted and compared. Character data is  sorted using rules that define the correct character sequence, with options for specifying casesensitivity, accent marks, kana character types and character width.
What's the difference between a primary key and a unique key?
Both primary key and unique enforce uniqueness of the column on which they are defined. But by default primary key creates a clustered index on the column, where are unique creates a nonclustered index by default. Another major difference is that, primary key doesn't allow NULLs, but unique key allows one NULL only.
What is difference between DELETE & TRUNCATE commands?
Delete command removes the rows from a table based on the condition that we provide with a WHERE clause. Truncate will actually remove all the rows from a table and there will be no data in the table after we run the truncate command.
Difference between Function and Stored Procedure?
UDF can be used in the SQL statements anywhere in the WHERE/HAVING/SELECT section where as Stored procedures cannot be. UDFs that return tables can be treated as another rowset. This can be used in JOINs with other tables. Inline UDF's can be though of as views that take parameters and can be used in JOINs and other Rowset operations.
What is the difference between a HAVING CLAUSE and a WHERE CLAUSE?
Specifies a search condition for a group or an aggregate. HAVING can be used only with the SELECT statement. HAVING is typically used in a GROUP BY clause. When GROUP BY is not used, HAVING behaves like a WHERE clause. Having Clause is basically used only with the GROUP BY function in a query. WHERE Clause is applied to each row before they are part of the GROUP BY function in a query.
What is SQL server agent?
SQL Server agent plays an important role in the day-to-day tasks of a database administrator (DBA). It is often overlooked as one of the main tools for SQL Server management. Its purpose is to ease the implementation of tasks for the DBA, with its full-function scheduling engine, which allows you to schedule your own jobs and scripts.
What is Raiseerror?
Stored procedures report errors to client applications via the RAISERROR command. RAISERROR doesn't change the flow of a procedure; it merely displays an error message, sets the @@ERROR automatic variable, and optionally writes the message to the SQL Server error log and the NT
application event log.
What is the difference between a local and a global variable?
A local temporary table exists only for the duration of a connection or, if defined inside a compound statement, for the duration of the compound statement.

A global temporary table remains in the database permanently, but the rows exist only within a given connection. When connection are closed, the data in the global temporary table disappears. However,  the table definition remains with the database for access when database is opened next time.

Saturday 24 May 2014

10 Time Management Tips That Work

10 Time Management Tips That Work

10K
3K
18K
10 Time Management Tips That Work
Chances are good that, at some time in your life, you've taken a time management class, read about it in books, and tried to use an electronic or paper-based day planner to organize, prioritize and schedule your day. "Why, with this knowledge and these gadgets," you may ask, "do I still feel like I can't get everything done I need to?"
The answer is simple. Everything you ever learned about managing time is a complete waste of time because it doesn't work.
Before you can even begin to manage time, you must learn what time is. A dictionary defines time as "the point or period at which things occur." Put simply, time is when stuff happens.
There are two types of time: clock time and real time. In clock time, there are 60 seconds in a minute, 60 minutes in an hour, 24 hours in a day and 365 days in a year. All time passes equally. When someone turns 50, they are exactly 50 years old, no more or no less.
In real time, all time is relative. Time flies or drags depending on what you're doing. Two hours at the department of motor vehicles can feel like 12 years. And yet our 12-year-old children seem to have grown up in only two hours.
Which time describes the world in which you really live, real time or clock time?
The reason time management gadgets and systems don't work is that these systems are designed to manage clock time. Clock time is irrelevant. You don't live in or even have access to clock time. You live in real time, a world in which all time flies when you are having fun or drags when you are doing your taxes.
The good news is that real time is mental. It exists between your ears. You create it. Anything you create, you can manage. It's time to remove any self-sabotage or self-limitation you have around "not having enough time," or today not being "the right time" to start a business or manage your current business properly.
There are only three ways to spend time: thoughts, conversations and actions. Regardless of the type of business you own, your work will be composed of those three items.
As an entrepreneur, you may be frequently interrupted or pulled in different directions. While you cannot eliminate interruptions, you do get a say on how much time you will spend on them and how much time you will spend on the thoughts, conversations and actions that will lead you to success. 
Practice the following techniques to become the master of your own time:
  1. Carry a schedule and record all your thoughts, conversations and activities for a week. This will help you understand how much you can get done during the course of a day and where your precious moments are going. You'll see how much time is actually spent producing results and how much time is wasted on unproductive thoughts, conversations and actions.
  2. Any activity or conversation that's important to your success should have a time assigned to it. To-do lists get longer and longer to the point where they're unworkable. Appointment books work. Schedule appointments with yourself and create time blocks for high-priority thoughts, conversations, and actions. Schedule when they will begin and end. Have the discipline to keep these appointments.
  3. Plan to spend at least 50 percent of your time engaged in the thoughts, activities and conversations that produce most of your results.
  4. Schedule time for interruptions. Plan time to be pulled away from what you're doing. Take, for instance, the concept of having "office hours." Isn't "office hours" another way of saying "planned interruptions?"
  5. Take the first 30 minutes of every day to plan your day. Don't start your day until you complete your time plan. The most important time of your day is the time you schedule to schedule time.
  6. Take five minutes before every call and task to decide what result you want to attain. This will help you know what success looks like before you start. And it will also slow time down. Take five minutes after each call and activity to determine whether your desired result was achieved. If not, what was missing? How do you put what's missing in your next call or activity?
  7. Put up a "Do not disturb" sign when you absolutely have to get work done.
  8. Practice not answering the phone just because it's ringing and e-mails just because they show up. Disconnect instant messaging. Don't instantly give people your attention unless it's absolutely crucial in your business to offer an immediate human response. Instead, schedule a time to answer email and return phone calls.
  9. Block out other distractions like Facebook and other forms of social media unless you use these tools to generate business.
  10. Remember that it's impossible to get everything done. Also remember that odds are good that 20 percent of your thoughts, conversations and activities produce 80 percent of your results.
Related Video: 
Street Smart Franchising
Matthews has held management roles with Subway, Blimpie, Motophoto and The Entrepreneur’s Source. DeBolt is a former president of the International Franchise Association. Percival works in franchise development. They are co-authors of Street Smart Franchising from Entrepreneur Press. 

How to Manage Your Time

These days, time seems to be at a premium. We have devices that keep us constantly connected with work, with friends and family, and sometimes even with complete strangers. As a result, it's easy to get distracted. If you're like most of us, you have a lot to accomplish. We'll show you a great way to do just that!

Steps

  1. Manage Your Time Step 1 Version 2.jpg
    1
    Prepare yourself first, by taking 30 minutes of your time to fix yourself something to eat and relax. Then Make a list of the tasks you need to accomplish. But before you can manage your time, you need to know what it is you must manage. A list of tasks, from the mundane to the critical, will help you get a handle on what needs to get done.
    • Assign realistic priorities to each task:
      • Priority 1: due today by 6pm
      • Priority 2: due tomorrow by 6pm
      • Priority 3: due by the end of the week
      • Priority 4: due during next week
    • You can further prioritize tasks within this grouping by adding a decimal place. For example, a Priority 1.0 task needs to be done immediately, whereas a Priority 1.5 task simply needs to be done by the end of day.
    Ad
  2. Manage Your Time Step 2 Version 2.jpg
    2
    Balance your effort. Work on small portions every day of work that will be due by the end of the week, starting with the most important tasks first.
    • Do today's tasks. Concentrate On what is at hand, do not allow yourself to lose focus. Then move on to the next daily task. Once today's tasks are completed, mark them as such, and proceed to tomorrow's tasks.
    • When tomorrow's tasks are complete, work on the other tasks due by the end of the week, and when those are complete, work on the tasks due early next week. A small portion of each is better than one huge,laborious task and will keep your time managed more efficiently and reduce stress and eliminate burn-out.
    • Make one of your final daily tasks the completion of tomorrow's task list. Each day should be ended with a new task sheet for tomorrow to keep you on track.
  3. Manage Your Time Step 3 Version 2.jpg
    3
    Focus on your most productive time of day. Some people work better in the morning, and some are more focused in the evening.
  4. Manage Your Time Step 4 Version 2.jpg
    4
    Manage time in increments. Play a game with yourself by competing against the clock.
    • Work in fifteen minute, half hour or hour intervals,scientifically it is known that 45 minutes work followed by a 10 minutes rest is the best for the average studier.
    • Give yourself a time goal to complete a portion of a task or the entire task.
  5. Manage Your Time Step 5 Version 2.jpg
    5
    Take a break. Clear your mind and refresh yourself to refocus.
    • Decide beforehand on a 5, 10 or 15 minute break and stick to that decision.
    • Breaks provide incentive by giving you something to look forward to having.
  6. Manage Your Time Step 6 Version 2.jpg
    6
    Keep track of your progress.
    • Cross things off the list as they are completed.
    • You'll feel more relieved and relaxed just by getting through the daily tasks. Not only will you be getting things done, finishing tasks will give you a sense of accomplishment and spur motivation.
  7. Manage Your Time Step 7 Version 2.jpg
    7
    Reassess the list. Rewrite and prioritize your list on a regular basis.
    • Add new tasks to the list. This should be done on a daily basis, especially when you are just getting started with a time management regimen.
    • Eliminate or adjust tasks that are completed, or fall in priority.
    • Delegate tasks to others. Contrary to popular belief, you don't need to do it all. You can be much more effective if you can delegate tasks as necessary.
    • Use technology to complete tasks more quickly, efficiently or accurately. Today's mobile technology features dozens, if not hundreds of apps that will help you manage—and even accomplish—your tasks efficiently.
  8. Manage Your Time Step 8 Version 2.jpg
    8
    Leave time for fun. While there are times when we just need to power through a large project, it's important to give yourself time to let loose. Not only will it refresh your mind, it's good for your body, too. It doesn't have to be a lot of time but make sure that you do!
  9. Manage Your Time Step 9 Version 2.jpg
    9
    Sleep for 7-9 hours every night. Getting the proper amount of sleep will help keep you alert and energetic, able to think clearly, and function at a high level.
    Ad
Add your own method

Installing and Testing Wampserver

Hopefully, you have now downloaded and installed Wampserver. This will give you a server on your own PC (Windows users), somewhere you can test your scripts. If you haven't yet dowloaded the Wampserver software, you can download it here:

If the installation went well, you should have an new icon in the bottom right, where the clock is:
Click the icon to see the menu above.
From here, you can stop the server, exit it, view help files, and see the configuration pages.
Click on localhost, though, and you'll see this page appear: (Localhost just refers to the server running on your own computer. Another way to refer to your server is by using the IP address 127.0.0.1.)
Click the link under Tools that says phpinfo(). If all went well, you should be looking at the following page (The one below is a different php version, but don't worry about this - as long as you see something):
The info.php page (click to open in a new window 66K)
If you saw the above page, then congratulations! Your PHP server is up and running, and you can make a start scripting PHP pages.

Troubleshooting

If you don't see the info.php page, then you will need to refer to the wampserver forums. The page you need is here:
Hopefully, your question will already have been asked an answered. (Unfortunately, we can't answer questions about Wampserver, as it's not our software.)


Saving your PHP files

Whenever you create a new PHP page, you need to save it in your WWW directory. You can see where this is by clicking its item on the menu:
When you click on www directory, you should see an explorer window appear. This one is from Windows Vista: (You'll probably have only two files, index and testmysql.)
This www folder for Wampserver is usally at this location on your hard drive:
c:/wamp/www/
Bear this in mind when you click File > Save As to save your PHP scripts.

Launching your PHP scripts

Suppose you have created a php script called test1.php. To launch this script, you need to add the script name after localhost in your browser. So instead of this:
http://localhost/index.php
You would type this:
http://localhost/test1.php
You don't type the name of the wamp folder, however. This would be wrong, for example:
c:/wamp/www/test1.php
As too would this:
http://localhost/www/test1.php
Your server knows where the www folder is, so you don't have to type it out: just add the script name tolocalhost. Likewise, if you create a folder under www then you'd just type this:
http://localhost/folder_name/script_name.php
OK, we'll assume that everything is now up and running. If it's not, click "Move on to the Next Part" below, for some troubleshooting. If it is, click "Back to the PHP Contents Page".

Tuesday 20 May 2014

Tutorial: How to write a WordPress Simple Plugin?

Tutorial: How to write a WordPress Simple Plugin?


WordPress is not just a blogging platform and it is such a powerful CMS with unlimited capabilities, besides having a huge user base. Almost anything can be scripted with wordpress. You can extend wordpress either by means of plugin or by a theme.
In this tutorial, i will show you how to write a Hello World wordpress plugin, which unlike many believe is surprisingly easy, once you understand the very fundamentals. All you need to have is a basic knowledge of php scripting.
Before we move on coding a plugin, please make sure you remember the following coding practices.
1. Always you chose a unique name to your plugin so that it doesnt collide with names used in other plugins.
2. Make sure you comment wherever and whenever necessary in the code.
3. You will to test the plugin in your localhost (using xampp) along with latest version of wordpress.

Plugin Files & Names

Assigning unique names, documenting and organizing the plugin files is very important part of plugin creation.

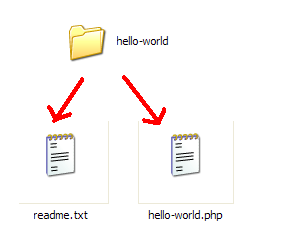
Although wordpress allows you to place the plugin php file directly into the wp-content/plugins folder, for a good plugin developer you will need to create a folder named hello-world and within place readme.txt and hello-world.php.
The readme.txt contains information about your plugin and can come in handy when you submit your plugin wordpress SVN plugin repository. See the readme sample.
Go ahead and create these files and we will add the content to these files later.

The Plugin Basics

The heart of a wordpress plugins is the below 2 functions (commonly called `hooks`)
add_action ($tag, $func) documentation
add_filter ($tag,$func) documentation
It is very important to know the difference between the above functions.
  • add_action –> does an action at various points of wordpress execution
  • add_filter –> does filtering the data (eg. escaping quotes before mysql insert, or during output to browser.
Refer to the WordPress Plugin API for more better understanding.

Plugin Information

Open your hello-world.php and in the first line, add this commented plugin information to your file.
<?php
/*
Plugin Name: Hello-World
Plugin URI: http://yourdomain.com/
Description: A simple hello world wordpress plugin
Version: 1.0
Author: Balakrishnan
Author URI: http://yourdomain.com
License: GPL
*/
?>
Save this php file,
  • Place the plugin folder to wordpress > wp-content > plugins,
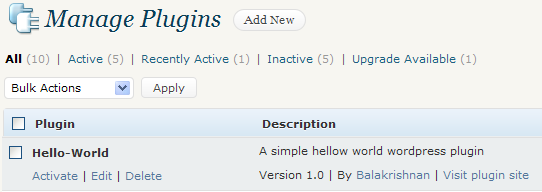
  • Go to your wordpress admin > plugins and you will see the new plugin listed, waiting to get activated.
simple ain’t it?

But this plugin had to do something right?

Why not we make it print  “Hello World” when we call it from wordpress theme template files.
for that we write the code using add_action below the commented plugin information in the hello-world.php
<?php
/*
Plugin Name: Hello-World
Plugin URI: http://yourdomain.com/
Description: A simple hello world wordpress plugin
Version: 1.0
Author: Balakrishnan
Author URI: http://yourdomain.com
License: GPL
*/
/* This calls hello_world() function when wordpress initializes.*/
/* Note that the hello_world doesnt have brackets.
add_action('init','hello_world');*/
function hello_world()
{
echo "Hello World";
}
?>
Thats it! Our Hello World plugin is nearly done and with just few lines of code. When our plugin is activated, add_action command calls our hello_world() function when wordpress starts loading.

Lets Test our Hello World Plugin

We really dont know whether our plugin works or not. To test our plugin, go to plugins, activate the hello-world plugin.
Then open your worldpress theme wp-content > themes > default, open any of index.php, archive.php or single.php and place the following code anywhere.
<?php
if(function_exists('hello_world')) {
hello_world();
}
?>
The key here is function_exists() call which checks whether plugin loaded or not and then allows the hook into the plugin function.  Call to hello_world() in the theme files without checking it, often leads to “Fatal error: call to undefined function” and our blog would crash, if the hello world plugin is not activated or deleted.

How to develop a "Hello World" plugin in wordpress

How to develop a "Hello World" plugin in wordpress

Hi all, hope you all are doing well and enjoying best of your healths.

Today i had been searching word-press official website for any tutorial for "how to develop a hello world plugin" and i couldn't find any good tutorial for this. Then i studied some other tutorials and asked my friends about it and thought that why not i should post this on my blog with very simple words, so that others can find a good tutorial on this. So here we go for the tutorial....

Step 1

Create a directory with name “hello-world-plugin” under wp-content/plugins, then create a file “hello-world-plugin.php”. put the following code to this file and save it.
1:  <?php  
2:  /*  
3:  Plugin Name: Hello world plugin  
4:  Plugin URI: http://localhost/wordpress/  
5:  Description: Add HTML snippets to posts and/or page footer.  
6:  Version: 0.1  
7:  Author: me  
8:  Disclaimer: No warranty, use this in your own risk.  
9:  */  
10:  ?>  

You have successfully created your first "Hello world" plugin and you can now activate this like other plugins from word-press admin panel. But for now this plugin wont do anything because we haven't put any logic behind this. so lets add some working code.

Step 2

for now “hello-world-plugin.php” file contains just plugin info. Let us open this and put below code under plugin info and save.
1:  add_action('wp_footer', 'hello_world_plugin_wp_footer');  
2:  function hello_world_plugin_wp_footer(){  
3:       echo '<div>Hello world! '. get_option('blogname') .'</div>';  
4:  }  


after adding this, just refresh your page and see "Hello World" printed in footer of your page. But make sure you have activated the plugin from admin panel.

In above code you can see add_action() function. Actually this is called action. Word-press follows hook architecture and this is the way to bind our function with word-press hooks. Word-press hooks is another topic and you can read this topic here.

That is all and we have now developed very simple "hello world" plugin in word-press. The whole code looks something like this,


1:  <?php  
2:  /*  
3:  Plugin Name: Hello world plugin  
4:  Plugin URI: http://localhost/wordpress/  
5:  Description: Add HTML snippets to posts and/or page footer.  
6:  Version: 0.1  
7:  Author: me  
8:  Disclaimer: No warranty, use this in your own risk.  
9:  */
10:  add_action('wp_footer', 'hello_world_plugin_wp_footer');  
11:  function hello_world_plugin_wp_footer(){  
12:       echo '<div>Hello world! '. get_option('blogname') .'</div>';  
13:  }  
14:  ?>  

Although this is a very simple plugin, but this teaches you how to take initiative for developing a plugin in word-press.

Please feel free to post your comments and feedback.

Featured post

Life Infotech now a leading brand in the field of technology training

  Life Infotech now a leading brand in the field of technology training & its invites students around the nation to be a part of the Tra...